In a time when Storm was still developed and maintained by Twitter, I was working on small experiments in local cluster mode by processing social data from Facebook. It rained a lot since then, and Storm is now an active project under Apache umbrella. The curiosity of mine was eager to see how would the Storm operate in multi node deployment, so I decided to build a cluster on SmartOS hypervisor. I really adore SmartOS. It is so lightweight and it loads from the USB media. While the other hypervisors I've tried (XenServer, ESX) reserved the "huge" amount of RAM (on my 24 GB server XenServer was taking almost 4GB for the Dom0), SmartOS needs 200-300 MB of RAM. The provisioning of new virtual machines is really fast. You can run an OS level virtualization units called zones, or the KVM based virtual machines to run almost any modern operating system (Linux, Windows, FreeBSD). You can learn more about SmartOS here.

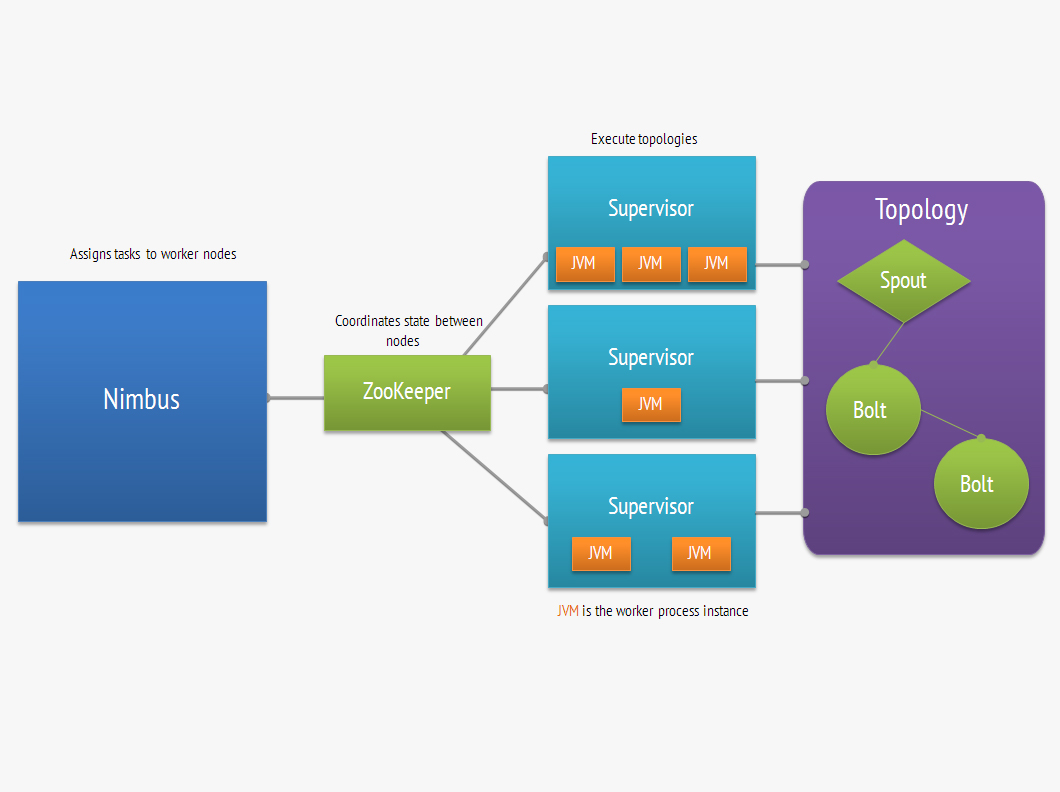
Are you new to Storm and you don't know what this is all about? Well apart from being a meteorological phenomenon, Storm is a distributed fault tolerant and realtime data stream processing platform. What Hadoop is for batch processing, Storm is for realtime data processing. There are two different type of nodes in Storm. The master node, also called asnimbusis responsible for assigning, monitoring and distributing tasks to worker orsupervisornodes in Storm terminology. In between there is aZooKeepernode which is responsible for coordination and auto discovery of the nodes. The computation workflow is encapsulated into the unit called topology. It is basically a graph ofspouts, components that represent the source of data streams andboltswhich do some sort of processing on input streams and often generate new streams. For example we could have a spout which consumes Apache log messages from RabbitMQ queue, and one or more bolts which apply some kind of transformation, aggregation, or filtering logic. As our business demand increases, we also want to process a ton of logs from Tomcat and Nginx and one worker node won't deal well with it. No problem! Just spawn a desired number of worker nodes to scale horizontally, and Storm will make sure data processing is balanced and distributed accross the nodes. And what if one of the worker node fails? Don't panic! Storm is able to reschedule and assign the task to one of the healthy nodes ensuring fault-tolerant exactly-once messaging semantics processing. The image below shows the components of a Storm cluster.
Preparing SmartOS VMs
Let’s first prepare the specifications for our SmartOS KVM virtual machines. I’ll use the Centos7 dataset to spawn Storm nodes. Find and import the image that corresponds to centos-7 dataset.
$ imgadm avail
...
c8c59f3c-a343-11e4-8e39-9360169bcaae  steelapp-developer      14.3.0      smartos  2015-01-23T21:07:03Z
02dbab66-a70a-11e4-819b-b3dc41b361d6  centos-7                20150128    linux    2015-01-28T16:23:36Z
5becfd74-a70d-11e4-93a6-470507be237c  centos-6                20150128    linux    2015-01-28T16:47:34Z
5f41692e-a70d-11e4-8c2d-afc6735144dc  debian-7                20150128    linux    2015-01-28T16:47:40Z
...
$ imgadm import 02dbab66-a70a-11e4-819b-b3dc41b361d6
The cluster will consist of these nodes:
- 1 ZooKeeper node with 1024 MB RAM and 1 VCPUs
- 1 Nimbus node with 3048 MB RAM and 2 VCPUs
- 3 Supervisor nodes with 4096 MB RAM and 3 VCPUs
Here is a specification file for ZooKeeper node (you will need to change the network settings to match your environment). Save it as centos7-zookeeper.json.
{
  "brand": "kvm",
  "resolvers": [
    "8.8.4.4"
  ],
  "ram": "1024",
  "vcpus": "1",
  "alias": "zookeeper/0",
  "nics": [
    {
      "nic_tag": "admin",
      "ip": "192.168.1.11",
      "netmask": "255.255.255.0",
      "gateway": "192.168.1.1",
      "model": "virtio",
      "primary": true
    }
  ],
  "disks": [
    {
      "image_uuid": "02dbab66-a70a-11e4-819b-b3dc41b361d6",
      "boot": true,
      "model": "virtio",
      "size": 10000
    }
  ]
}
The specifications for the Nimbus node is as follow. For the supervisor nodes we will basically use the same spec with some minor modifications.
{
  "brand": "kvm",
  "resolvers": [
    "8.8.4.4"
  ],
  "ram": "3048",
  "alias": "nimbus/0",
  "vcpus": "2",
  "nics": [
    {
      "nic_tag": "admin",
      "ip": "192.168.1.12",
      "netmask": "255.255.255.0",
      "gateway": "192.168.1.1",
      "model": "virtio",
      "primary": true
    }
  ],
  "disks": [
    {
      "image_uuid": "02dbab66-a70a-11e4-819b-b3dc41b361d6",
      "boot": true,
      "model": "virtio",
      "size": 30000
    }
  ]
}
Installing ZooKeeper node
Create a ZooKeeper VM from the spec file.
$ vmadm create -f centos7-zookeeper.jsonMake sure you can login into your newly created VM. Now we will install the required dependencies. First, download and install JDK 7.
$ cd /tmp
$ wget --no-check-certificate --no-cookies --header "Cookie: oraclelicense=accept-securebackup-cookie" http://download.oracle.com/otn-pub/java/jdk/7u75-b13/jdk-7u75-linux-x64.tar.gz
$ tar -xvf jdk-7u75-linux-x64.tar.gz
$ mv /usr/lib/jvm/java-7-oracle

$ vi /etc/profile
$ export JAVA_HOME=/usr/lib/jvm/java-7-oracle
$ export PATH=$PATH:/usr/lib/jvm/java-7-oracle/bin

$ source /etc/profile
Next, install ZooKeeper packages from the Cloudera repository.
$ vi /etc/yum.repos.d/Cloudera.repo

[cloudera-cdh4]
name=cloudera-cdh4
baseurl=http://archive.cloudera.com/cdh4/redhat/6/x86_64/cdh/4/
gpgkey = http://archive.cloudera.com/cdh4/redhat/6/x86_64/cdh/RPM-GPG-KEY-cloudera
gpgcheck = 1

$ yum install zookeeper zookeeper-server
If the installation went successful we are ready to configure ZooKeeper. It is important to enable the regular purging of old data and transaction logs, otherwise ZooKeeper will eat all of your disk space. Edit the configuration file.
$ vi /etc/zookeeper/conf/zoo.cfg

autopurge.purgeInterval=12
autopurge.snapRetainCount=5
Update the /etc/hosts file to include ZooKeeper’s hostname.
$ vi /etc/hosts
192.168.1.11 zookeeper0
Finally we can start the ZooKeeper and verify it’s working as expected. Run these commands.
$ /usr/lib/zookeeper/bin/zkServer.sh start
$ echo ruok | nc zookeeper0 2181
imok
It is of crucial importance to run ZooKeeper under supervision, since ZooKeeper will terminate if it encounters any error. To achieve it you can use a number of process monitoring tools like monit, supervisord, or god.
Deploying Nimbus node
First, provision a new virtual machine for the Nimbus node.
$ vmadm create -f centos7-nimbus.jsonThe following steps apply for both, the Nimbus and the Supervisor nodes, so once we had the required dependencies installed, we will create the snapshot that later on can be used to provision the Supervisor nodes. Note that here is also important to run Nimbus and Supervisor daemons under supervision.
Download and install JDK 7
$ cd /tmp
$ wget --no-check-certificate --no-cookies --header "Cookie: oraclelicense=accept-securebackup-cookie" http://download.oracle.com/otn-pub/java/jdk/7u75-b13/jdk-7u75-linux-x64.tar.gz
$ tar -xvf jdk-7u75-linux-x64.tar.gz
$ mv /usr/lib/jvm/java-7-oracle

$ vi /etc/profile
$ export JAVA_HOME=/usr/lib/jvm/java-7-oracle
$ export PATH=$PATH:/usr/lib/jvm/java-7-oracle/bin

$ source /etc/profile
Install ZeroMQ
Add the following repository to install the ZeroMQ package.
$ vi /etc/yum.repos.d/ZeroMQ.repo

[home_fengshuo_zeromq]
name=The latest stable of zeromq builds (CentOS_CentOS-6)
type=rpm-md
baseurl=http://download.opensuse.org/repositories/home:/fengshuo:/zeromq/CentOS_CentOS-6/
gpgcheck=1
gpgkey=http://download.opensuse.org/repositories/home:/fengshuo:/zeromq/CentOS_CentOS-6/repodata/repomd.xml.key
enabled=1

$ yum install zeromq zeromq-devel
Install JZMQ
JZMQ are the Java bindings for the ZeroMQ messaging framework. As we are going to compile and build JZMQ from sources, some dependencies are needed. Install them first.
$ yum install libtool gcc autoconf automake gcc-c++
Now we can download and install JZMQ.
$ cd /tmp
$ wget https://github.com/zeromq/jzmq/archive/master.zip
$ cd jzmq-master

$ ./autogen.sh
$ ./configure
$ make
$ make install
Create Storm system user and group
$ groupadd -g 53001 storm
$ mkdir /var/lib/storm
$ useradd -u 53001 -g 53001 -d /var/lib/storm/ -s /bin/bash storm -c "Storm user"
$ chown -R storm:storm /var/lib/storm/
$ chmod 750 /var/lib/storm
Download and install Apache Storm
Download the latest version of Storm - 0.9.3 at the time of writing. Decompress the tarball and move it to the /usr/local directory.
$ wget http://ftp.cixug.es/apache/storm/apache-storm-0.9.3/apache-storm-0.9.3.tar.gz
$ tar -xvf apache-storm-0.9.3.tar.gz
$ mv apache-storm-0.9.3 /usr/local/
$ cd /usr/local
$ mv apache-storm-0.9.3 storm
$ chown -R storm:storm /usr/local/storm/
Configure Storm
Add ZooKeeper and Nimbus nodes to the hosts file.
$ vi /etc/hosts
192.168.1.11 zookeeper0
192.168.1.12 nimbus/0
Now edit the Storm configuration file. You need to add the ZooKeeper server/s, the Nimbus node, and change the path where Storm will store a small amount of state data.
$ vi /usr/local/storm/conf/storm.yaml

storm.zookeeper.servers:
      - "zookeeper0"

nimbus.host: "nimbus/0"

nimbus.childopts: "-Xmx1024m -Djava.net.preferIPv4Stack=true"
ui.childopts: "-Xmx768m -Djava.net.preferIPv4Stack=true"
supervisor.childopts: "-Djava.net.preferIPv4Stack=true"
worker.childopts: "-Xmx768m -Djava.net.preferIPv4Stack=true"

storm.local.dir: "/var/lib/storm"
Build the snapshot
Before we proceed with snapshotting, halt the Nimbus virtual machine.
$ vmadm stop ab09289c-c05a-4c41-92ec-025b367bc860Now make the snapshot of disk0 zvol which pertains to Nimbus dataset. Dump and compress the dataset.
$ zfs snapshot zones/ab09289c-c05a-4c41-92ec-025b367bc860-disk0@image
$ zfs send zones/ab09289c-c05a-4c41-92ec-025b367bc860-disk0@image | gzip > supervisor.zvol.gz
To import the dataset that can be used as the template for the Supervisor node provisioning it is necessary to build the image manifest. Generate a random UUID and get the SHA1 hash of the supervisor dataset by running these commands.
$ uuid
$ digest -v -a sha1 supervisor.zvol.gz
We will also need the size of the dataset expressed in bytes.
$ ls -ltr | grep supervisor.zvol.gz | awk '{print $5}'
859618398
With that information in hand we can create an image manifest file and import the dataset.
$ vi /var/manifests/supervisor.dsmanifest{
"uuid": "1d94a2ec-cfe0-11e4-a9be-9b1c2d718bba",
"name": "centos7-supervisor",
"version": "1.0.0",
"description": "Base template to provision Storm supervisor nodes",
"v": 2,
"os": "linux",
"type": "zvol",
"platform_type": "smartos",
"created_at": "2015-03-21T09:09Z",
"updated_at": "2015-03-21T09:09Z",
"published_at": "2015-03-21T09:09Z",
"files": [
{
"path": "/var/supervisor.zvol.gz",
"sha1": "12b6ae88372eab0697f0bba3038a4c9fc0a94a7f",
"size": 859618398,
"compression": "gzip"
}
],
"disk_driver": "virtio",
"image_size": "10240"
}$ imgadm install -m /var/manifests/supervisor.dsmanifest -f /var/supervisor.zvol.gz
Installing image 1d94a2ec-cfe0-11e4-a9be-9b1c2d718bba (centos7-supervisor@1.0.0)
[=======================================================>] 100% 819.80MB 31.36MB/s 26s
Installed image 1d94a2ec-cfe0-11e4-a9be-9b1c2d718bba (centos7-supervisor@1.0.0)Provisioning Supervisor nodes
With the dataset imported we can start provisioning the Supervisor nodes using the slightly modified version of the Nimbus node specification file.
{
  "brand": "kvm",
  "resolvers": [
    "8.8.4.4"
  ],
  "ram": "4096",
  "alias": "supervisor/0",
  "vcpus": "3",
  "nics": [
    {
      "nic_tag": "admin",
      "ip": "192.168.1.14",
      "netmask": "255.255.255.0",
      "gateway": "192.168.1.1",
      "model": "virtio",
      "primary": true
    }
  ],
  "disks": [
    {
      "image_uuid": "1d94a2ec-cfe0-11e4-a9be-9b1c2d718bba",
      "boot": true,
      "model": "virtio",
      "size": 50000
    }
  ]
}
Note that we have changed the image_uuid to point to our imported dataset, and we have assigned the Supervisor node more memory, disk and one additional CPU. Now we can easily deploy and scale the worker nodes.
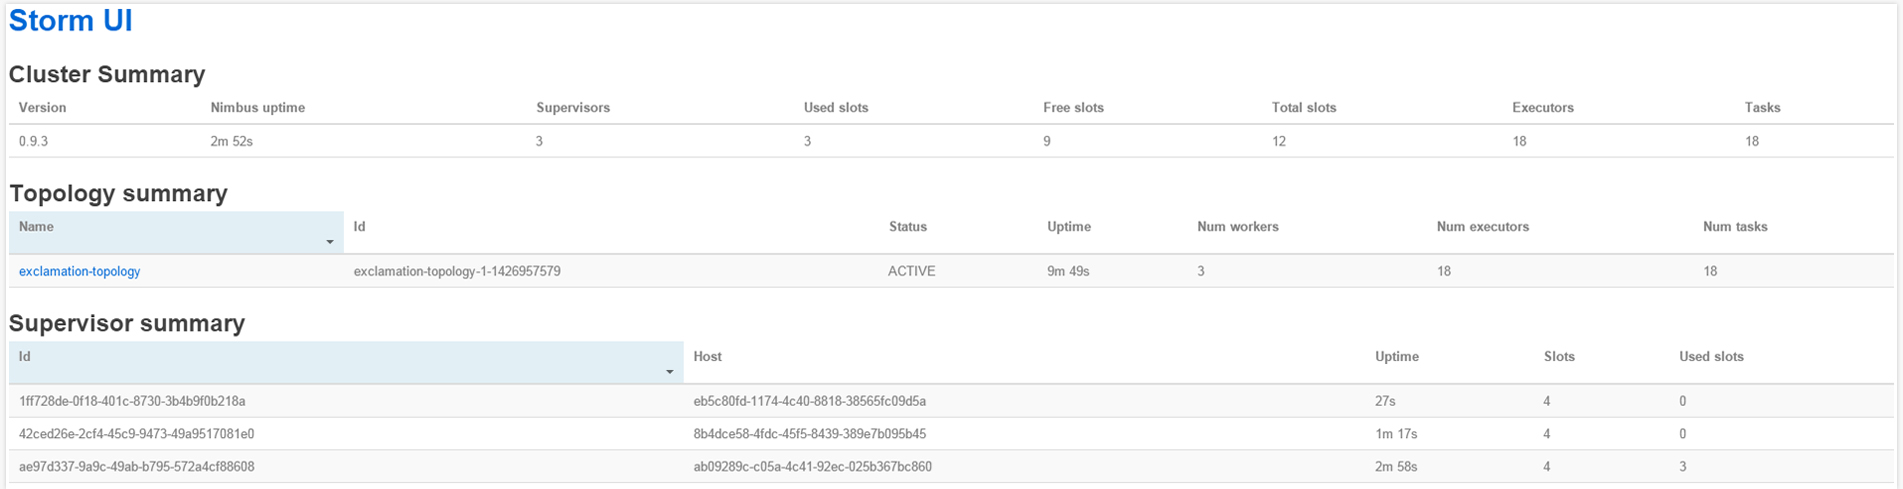
$ vmadm create -f centos7-supervisor.jsonThis is the output of vmadm list on my SmartOS instance.
$ vmadm list

UUID                                  TYPE  RAM      STATE             ALIAS
05af15b2-f8ae-4918-807c-ed9a3a57d522  KVM   1024     running           zookeeper/0
8d8bb235-3826-46bb-88e4-f96cdc182faa  KVM   3048     running           nimbus/0
8b4dce58-4fdc-45f5-8439-389e7b095b45  KVM   4096     running           supervisor/1
ab09289c-c05a-4c41-92ec-025b367bc860  KVM   4096     running           supervisor/0
eb5c80fd-1174-4c40-8818-38565fc09d5a  KVM   4096     running           supervisor/2
Submitting the topology
I assume you've run /usr/local/storm/bin/storm nimbus and /usr/local/storm/bin/storm supervisor daemons under supervision. To test the cluster, we are going to deploy a simple topology from the storm-starter project. Run these commands on the Nimbus node. Start by cloning the Storm repository.
$ cd /root
$ git clone git://github.com/apache/storm.git
Go to storm/examples/storm-starter directory and build the topology jar using Maven.
$ cd storm/examples/storm-starter
$ mvn clean install -DskipTests=true
Finally, submit the topology to the Storm cluster.
$ cd target
$ /usr/local/storm/bin/storm jar storm-starter-0.10.0-SNAPSHOT.jar storm.starter.ExclamationTopology exclamation-topology

Running: /usr/lib/jvm/java-7-oracle/bin/java -client -Dstorm.options= -Dstorm.home=/usr/local/storm -Dstorm.log.dir=/usr/local/storm/logs
...
2539 [main] INFO  backtype.storm.StormSubmitter - Jar not uploaded to master yet. Submitting jar...
2553 [main] INFO  backtype.storm.StormSubmitter - Uploading topology jar storm-starter-0.10.0-SNAPSHOT.jar to assigned location: /var/lib/storm/nimbus/inbox/stormjar-30afcd84-fd2e-4463-8275-8ff0133eff15.jar
Start uploading file 'storm-starter-0.10.0-SNAPSHOT.jar' to '/var/lib/storm/nimbus/inbox/stormjar-30afcd84-fd2e-4463-8275-8ff0133eff15.jar' (152705 bytes)
[==================================================] 152705 / 152705
File 'storm-starter-0.10.0-SNAPSHOT.jar' uploaded to '/var/lib/storm/nimbus/inbox/stormjar-30afcd84-fd2e-4463-8275-8ff0133eff15.jar' (152705 bytes)
2576 [main] INFO  backtype.storm.StormSubmitter - Successfully uploaded topology jar to assigned location: /var/lib/storm/nimbus/inbox/stormjar-30afcd84-fd2e-4463-8275-8ff0133eff15.jar
2576 [main] INFO  backtype.storm.StormSubmitter - Submitting topology exclamation-topology in distributed mode with conf {"topology.workers":3,"topology.debug":true}
2716 [main] INFO  backtype.storm.StormSubmitter - Finished submitting topology: exclamation-topology
You can get detailed stats about the cluster infrastructure, configuration, topology execution, etc. from the Storm UI. Start the server.
/usr/local/storm/bin/storm uiDirect your browser to http://numbus_node_ip:8080.